1. Decorator Design Pattern
Decorator is a structural design pattern that lets you attach new behaviors to objects by placing these objects inside special wrapper objects that contain the behaviors.
Decorator Pattern is basically used to add new functionality to an existing class without changing the original class [ following the open — close principle]
“Wrapper” is the alternative nickname for the Decorator pattern that clearly expresses the main idea of the pattern. A wrapper is an object that can be linked with some target object. The wrapper contains the same set of methods as the target and delegates to it all requests it receives. However, the wrapper may alter the result by doing something either before or after it passes the request to the target.
Example:
Initial Setup of our class [ say for ex we have a Car Class ]
one abstract function which we will implement later on which gives us the price of the car we want to purchase.
  public abstract class Car
    {
        public string carName;
        public string carColor;

        public virtual string GetCarName()
        {
            return carName;
        }

        public string GetCarColor()
        {
            return carColor;
        }

        public abstract int GetCarPrice();
    }
BMW which will extend our class CAR. now in BMW class we will give the name , colour and will also implement our abstract function to give the initial price of the car without any add ons
 public class Bmw : Car
    {
        public Bmw()
        {
            carName = "BMW";
            carColor = "RED";
        }

        public override int GetCarPrice()
        {
            return 200;
        }
    }
let’s create one more car say -> AUDI
 public class Audi : Car
    {
        public Audi()
        {
            carName = "Audi";
            carColor = "Blue";
        }

        public override int GetCarPrice()
        {
            return 100;
        }
    }
We want to have some add on features with our car, say for ex -> Music System , AIR Bags etc ;
now one way is to add them directly to each car but what if there are 10,000 cars then it would not make any sense.so we will first create a decorator class which we will use whenever we want to add new feature to our car class
 public abstract class CarDecorator : Car
    {
        protected Car car;
        protected CarDecorator(Car car)
        {
            this.car = car;
        }
    }
Now for every feature we want to add we can create a class that extends this decorator class and then modify our price accordingly so that we can get the exact price for the car after adding new items
Music-System class :
 public class MusicSystemFeature : CarDecorator
    {
        public MusicSystemFeature(Car car):base(car)
        {
        }

        public override string GetCarName()
        {
            return car.GetCarName() + " with music system";
        }

        public override int GetCarPrice()
        {
            return car.GetCarPrice() + 30;
        }
    }
let’s create our air bag class as well :
 public class AirBagFeature : CarDecorator
    {
        public AirBagFeature(Car car):base(car)
        {
        }

        public override string GetCarName()
        {
            return car.GetCarName() + " with AirBag";
        }

        public override int GetCarPrice()
        {
            return car.GetCarPrice() + 50;
        }
    }
Now for every feature we want to add we can create a class that extends this decorator class and then modify our price accordingly so that we can get the exact price for the car after adding new items. Now here we use on instance of our car class and now we can update the name of the car as well as add the price of the feature. lets see how our decorators help us to add feature to our own class without changing the base class
 class Program
    {
        static void Main(string[] args)
        {
            Car car = new Bmw();
            Console.WriteLine("Car Name " + car.GetCarName());
            Console.WriteLine("Car Price " + car.GetCarPrice());

            Console.WriteLine("Adding Music system with Car");
            car = new MusicSystemFeature(car);
            Console.WriteLine("Car Name " + car.GetCarName());
            Console.WriteLine("Car Price " + car.GetCarPrice());

            Console.WriteLine("Adding Music system with AirBag");
            car = new AirBagFeature(car);
            Console.WriteLine("Car Name " + car.GetCarName());
            Console.WriteLine("Car Price " + car.GetCarPrice());
        }
    }
Output:
Car Name BMW
Car Price 200
Adding Music system with Car
Car Name BMW with music system
Car Price 230
Adding Music system with AirBag
Car Name BMW with music system with AirBag
Car Price 280
Class Diagram
2. Adapter Design Pattern
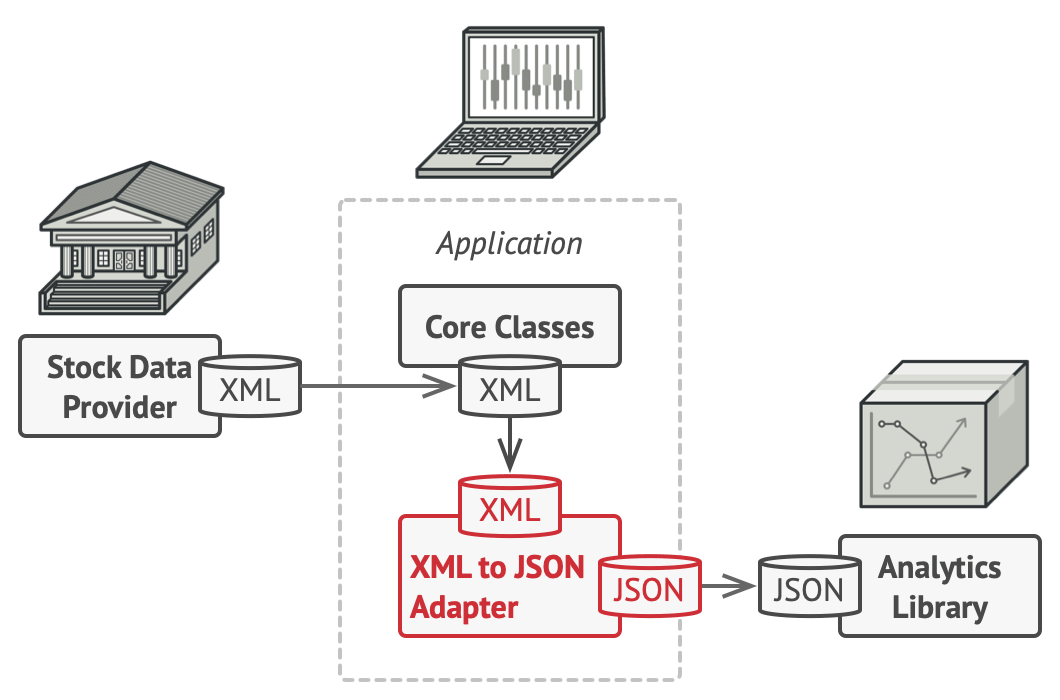
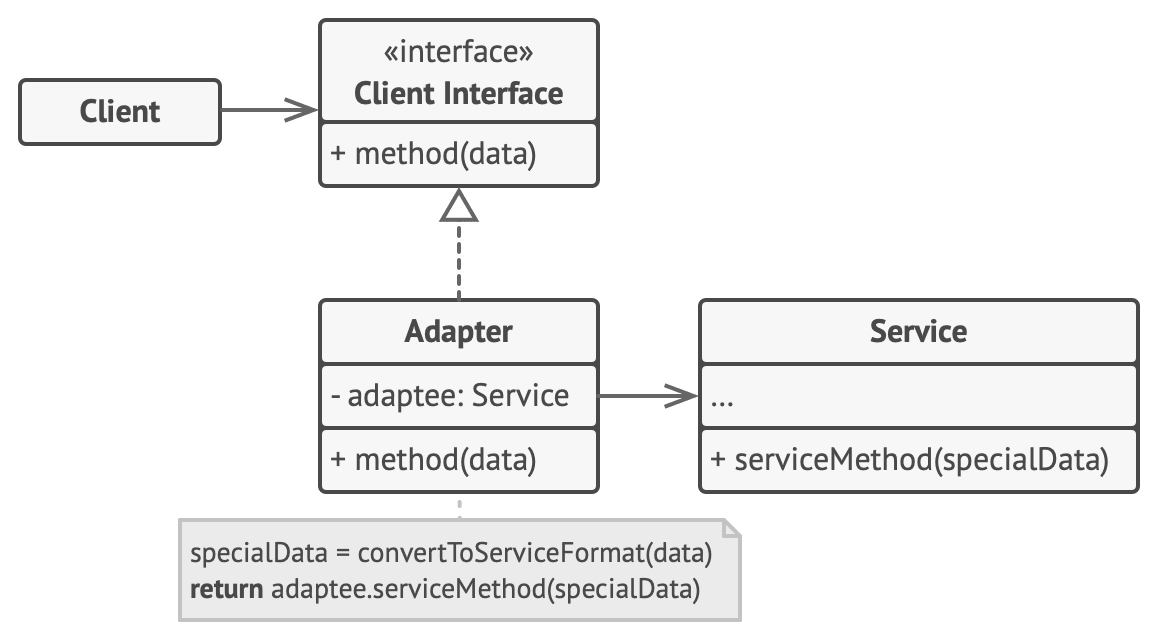
- The adapter gets an interface, compatible with one of the existing objects.
- Using this interface, the existing object can safely call the adapter’s methods.
- Upon receiving a call, the adapter passes the request to the second object, but in a format and order that the second object expects.
using System;

namespace Adapter.Structural
{
    /// <summary>
    /// The 'Target' class
    /// </summary>

    public class Target
    {
        public virtual void Request()
        {
            Console.WriteLine("Called Target Request()");
        }
    }

    /// <summary>
    /// The 'Adapter' class
    /// </summary>

    public class Adapter : Target
    {
        private Adaptee adaptee = new Adaptee();

        public override void Request()
        {
            // Possibly do some other work
            // and then call SpecificRequest

            adaptee.SpecificRequest();
        }
    }

    /// <summary>
    /// The 'Adaptee' class
    /// </summary>

    public class Adaptee
    {
        public void SpecificRequest()
        {
            Console.WriteLine("Called SpecificRequest()");
        }
    }

     /// <summary>
    /// Adapter Design Pattern
    /// </summary>

    public class Program
    {
        public static void Main(string[] args)
        {
            // Create adapter and place a request

            Target target = new Adapter();
            target.Request();

            // Wait for user

            Console.ReadKey();
        }
    }
}public interface IShape
{
void Draw();
}public abstract class Shape
{
protected IShape _shape;
public Shape(IShape shape)
{
_shape = shape;
}
public abstract void Draw();
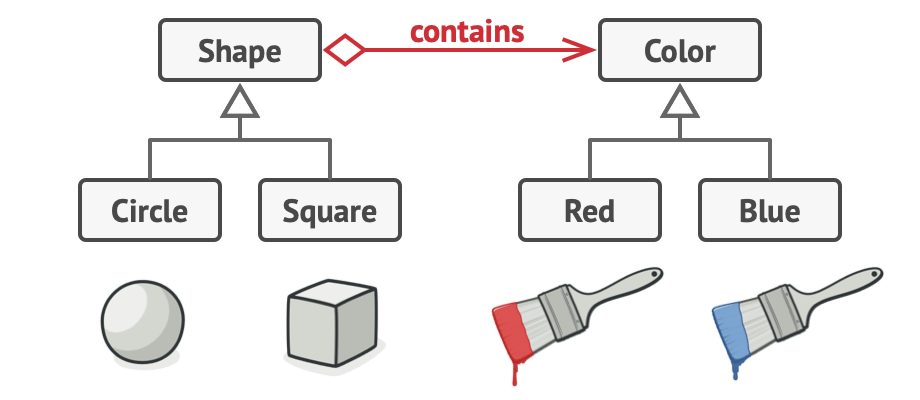
}_shape) and a constructor that takes an instance of the abstraction. We also have an abstract Draw method that will be implemented by subclasses.Next, we define some concrete implementations of the abstraction:
public class Circle : IShape
{
    public void Draw()
    {
        Console.WriteLine("Drawing Circle");
    }
}

public class Square : IShape
{
    public void Draw()
    {
        Console.WriteLine("Drawing Square");
    }
}Shape abstract class that implement the Draw method using the abstraction:public class RedShape : Shape
{
public RedShape(IShape shape) : base(shape)
{
}
public override void Draw()
{
Console.ForegroundColor = ConsoleColor.Red;
_shape.Draw();
Console.ResetColor();
}
}
public class BlueShape : Shape
{
public BlueShape(IShape shape) : base(shape)
{
}
public override void Draw()
{
Console.ForegroundColor = ConsoleColor.Blue;
_shape.Draw();
Console.ResetColor();
}
}Draw method and use the abstraction (_shape) to draw the shape. We also add some extra color to the output.To use this pattern, we can create instances of the concrete implementations of the abstraction and pass them to instances of the subclasses of the Shape abstract class:
var circle = new Circle();
var square = new Square();

var redCircle = new RedShape(circle);
var blueSquare = new BlueShape(square);

redCircle.Draw();   // Output: Drawing Circle in red
blueSquare.Draw(); // Output: Drawing Square in blue- Define an interface or an abstract class that will serve as the product of the factory:
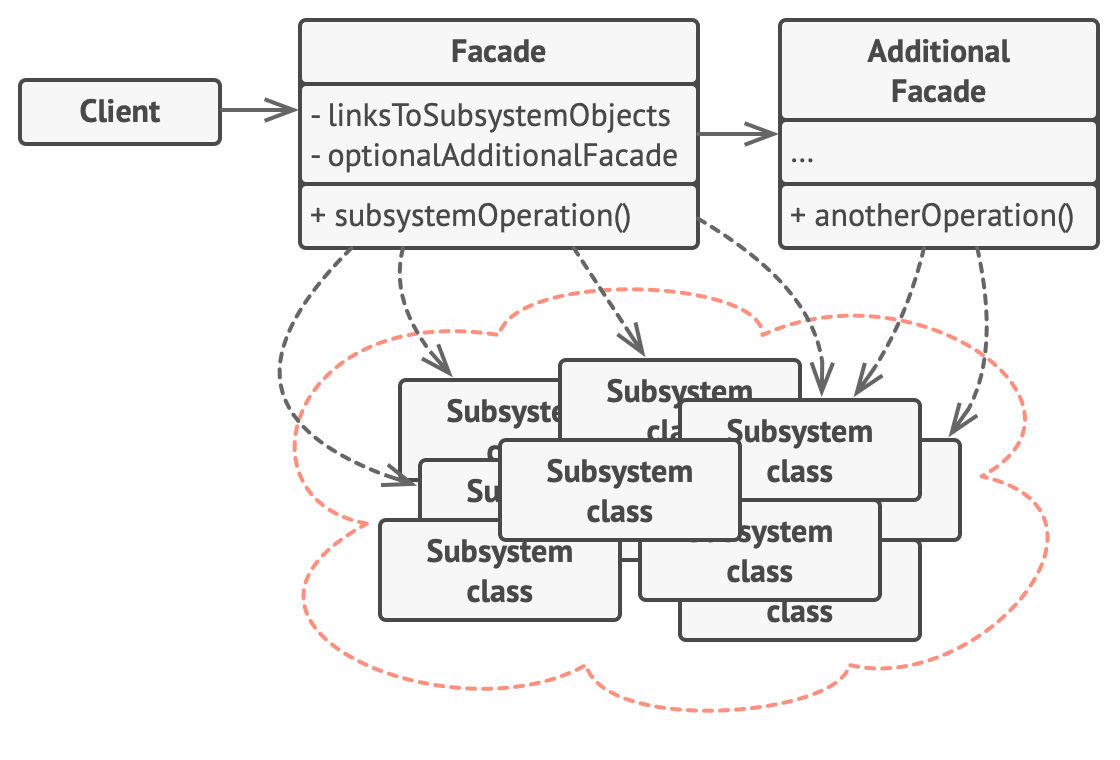
public interface ISubSystemA
{
    void OperationA();
}

public interface ISubSystemB
{
    void OperationB();
}

public interface ISubSystemC
{
    void OperationC();
}public class SubSystemA : ISubSystemA
{
public void OperationA()
{
Console.WriteLine("SubSystemA OperationA");
}
}
public class SubSystemB : ISubSystemB
{
public void OperationB()
{
Console.WriteLine("SubSystemB OperationB");
}
}
public class SubSystemC : ISubSystemC
{
public void OperationC()
{
Console.WriteLine("SubSystemC OperationC");
}
}public class Facade
{
private readonly ISubSystemA _subSystemA;
private readonly ISubSystemB _subSystemB;
private readonly ISubSystemC _subSystemC;
public Facade(ISubSystemA subSystemA, ISubSystemB subSystemB, ISubSystemC subSystemC)
{
_subSystemA = subSystemA;
_subSystemB = subSystemB;
_subSystemC = subSystemC;
}
public void Operation()
{
_subSystemA.OperationA();
_subSystemB.OperationB();
_subSystemC.OperationC();
}
}static void Main(string[] args)
{
var subSystemA = new SubSystemA();
var subSystemB = new SubSystemB();
var subSystemC = new SubSystemC();
var facade = new Facade(subSystemA, subSystemB, subSystemC);
facade.Operation();
}using System;
// Interface for the subject and the proxy
public interface ISubject
{
void Request();
}
// Real subject class
public class RealSubject : ISubject
{
public void Request()
{
Console.WriteLine("RealSubject: Handling request.");
}
}
// Proxy class
public class Proxy : ISubject
{
private RealSubject _realSubject;
public void Request()
{
if (_realSubject == null)
{
_realSubject = new RealSubject();
}
Console.WriteLine("Proxy: Handling request.");
_realSubject.Request();
}
}
// Client code
class Program
{
static void Main(string[] args)
{
// Creating a proxy object
Proxy proxy = new Proxy();
// Client interacts with the proxy object, not the real subject object
proxy.Request();
}
}In the example above, we have an interface ISubject that both the RealSubject and Proxy classes implement. The RealSubject class is the object that the client wants to interact with, but instead of directly accessing the RealSubject object, the client interacts with the Proxy object.
The Proxy class contains a reference to the RealSubject object and forwards the client's requests to the RealSubject object. If the RealSubject object doesn't exist yet, the Proxy creates it.
When the client calls the Request() method on the Proxy object, the Proxy first handles the request and then forwards it to the RealSubject object.
This allows the Proxy object to control access to the RealSubject object, for example, by adding additional security checks or caching results.




No comments:
Post a Comment