.NET
Core Interview Question?
1. What are the benefits of using ASP.NET Core over ASP.NET?
- Cross platform, provide ability to develop and run on Windows, Linux and MacOS.
- Open-source
- Unified Platform to develop Web UI and services.
- Built-in dependency injection.
- Ability to deploy on more than one server like IIS, Kestrel, Nginx, Docker, Apache etc
- Cloud enabled framework, provide support for environment based configuration systems.
- Lightweight, High performance and modern HTTP request pipelines.
- well suited architecture for testability
- Integration of many client-side frameworks like Angular any version
- Blazor allow you to use C# code in browser with JavaScript code
2. What is the role of Startup class?
Startup class is responsible for configuration related
things as below.
- It configures the services which are required by the app.
- It defines the app's request handling pipeline as a series of middleware components.
Startup class is specified inside the 'CreateHostBuilder'
method when the host is created.
Multiple Startup classes can also be defined for different environments, At run
time appropriate startup class is used.
using Microsoft.EntityFrameworkCore;
using TodoApi.Models;

var builder = WebApplication.CreateBuilder(args);

builder.Services.AddControllers();
builder.Services.AddDbContext<TodoContext>(opt =>
    opt.UseInMemoryDatabase("TodoList"));
builder.Services.AddEndpointsApiExplorer();
builder.Services.AddSwaggerGen();

var app = builder.Build();

if (app.Environment.IsDevelopment())
{
    app.UseSwagger();
    app.UseSwaggerUI();
}

app.UseHttpsRedirection();

app.UseAuthorization();

app.MapControllers();

app.Run();
3. What is the role of ConfigureServices
and Configure method?
ConfigureServices and Configure methods are two of the most important methods in ASP.NET Core's startup class. These methods are used to configure the application's services and request handling pipeline, respectively.
ConfigureServices is called at startup and is used to configure the application's services, such as database connections, authentication, authorization, and dependency injection. In this method, you register services and dependencies that your application requires. It is responsible for registering services with the application's dependency injection (DI) container.
Configure is also called at startup and is used to configure the application's request pipeline. This method is responsible for configuring middleware components that are used to handle incoming HTTP requests, such as routing, authentication, authorization, exception handling, and so on. In this method, you specify how the middleware components should be configured and in what order they should be executed.
Both of these methods work together to define how the application will handle incoming requests and what services it requires to do so. They are essential components of the ASP.NET Core framework and are required in every application.
4. Describe the Dependency Injection.
.NET supports the dependency injection (DI) software design pattern, which is a technique for achieving Inversion of Control (IoC) between classes and their dependencies. Dependency injection in .NET is a built-in part of the framework, along with configuration, logging, and the options pattern.
Dependency injection addresses these problems through:
- The use of an interface or base class to abstract the dependency implementation.
- Registration of the dependency in a service container. .NET provides a built-in service container, IServiceProvider. Services are typically registered at the app's start-up and appended to an IServiceCollection. Once all services are added, you use BuildServiceProvider to create the service container.
- Injection of the service into the constructor of the class where it's used. The framework takes on the responsibility of creating an instance of the dependency and disposing of it when it's no longer needed.
5. Describe the Service Lifetimes.
When Services are registered, there is a lifetime for every
service. ASP.NET Core provide following lifetimes.
Transient - Services with transient
lifetime are created each time they are requested from service container. So
it's best suited for stateless, light weight services.
Scoped - Services with scoped
lifetime are created once per connection or client request. When using scoped
service in middleware then inject the service via invoke or invokeAsync method.
You should not inject the service via constructor injection as it treats the
service behavior like Singleton.
Singleton - Service
with singleton lifetime is created once when first time the service is
requested. For subsequent requests same instance is served by service
container.
6. Explain the Middleware in ASP.NET
Core.
The Request handling pipeline is a sequence of middleware
components where each component performs the operation on request and either
call the next middleware component or terminate the request. When a middleware
component terminates the request, it's called Terminal Middleware as
It prevents next middleware from processing the request. You can add a
middleware component to the pipeline by calling .Use... extension
method as below.
app.UseHttpsRedirection();
app.UseStaticFiles();
app.UseRouting();
So Middleware component is program that's build into
an app's pipeline to handle the request and response. Each middleware component
can decide whether to pass the request to next component and to perform any operation
before or after next component in pipeline.
7. What is Request delegate?
Request delegates handle each HTTP request and are used
to build request pipeline. It can configured using Run, Map and Use extension
methods. An request delegate can be a in-line as an anonymous method (called
in-line middleware) or a reusable class. These classes or in-line methods are
called middleware components.
8. What is Host in ASP.NET Core?
ASP.NET Core apps configure and launch a host. The host is responsible for app startup and lifetime management. At a minimum, the host configures a server and a request processing pipeline. The host can also set up logging, dependency injection, and configuration.
9. Describe the Generic Host and Web
Host.
Generic Host
In ASP.NET Core, the Generic Host is a new hosting model that provides a streamlined approach for building console apps and background services. It is built on top of the Microsoft.Extensions.Hosting.Abstractions library, which provides a set of interfaces and abstractions for creating and configuring a host.
The Generic Host is designed to be lightweight and modular, allowing developers to easily add and configure services using dependency injection. It also provides built-in support for logging, configuration, and environment variables. You can create a new host using the HostBuilder class, which provides a fluent API for configuring the host and its services.
In below example, the CreateDefaultBuilder method is used to create a default host builder with built-in configuration for logging and configuration. The ConfigureWebHostDefaults method is then used to configure the web host using the Kestrel web server and the Startup class.
using Microsoft.AspNetCore.Hosting;
using Microsoft.Extensions.Hosting;

public static void Main(string[] args)
{
    CreateHostBuilder(args).Build().Run();
}

public static IHostBuilder CreateHostBuilder(string[] args) =>
    Host.CreateDefaultBuilder(args)
        .ConfigureWebHostDefaults(webBuilder =>
        {
            webBuilder.UseKestrel();
            webBuilder.UseStartup<Startup>();
        });
WebHost
In ASP.NET Core, the Web Host is a hosting model that provides a simple and easy-to-use approach for building web applications. It is built on top of the Microsoft.AspNetCore.Hosting.Abstractions library, which provides a set of interfaces and abstractions for creating and configuring a web host.
The Web Host is designed to be lightweight and modular, allowing developers to easily add and configure services using dependency injection. It also provides built-in support for logging, configuration, and environment variables. You can create a new host using the WebHostBuilder class, which provides a fluent API for configuring the host and its services.
In below example, the CreateDefaultBuilder method is used to create a default web host builder with built-in configuration for logging and configuration. The UseKestrel method is then used to configure the web host using the Kestrel web server, and the UseStartup method is used to specify the Startup class for the application.
using Microsoft.AspNetCore.Hosting;
using Microsoft.Extensions.Hosting;

public static void Main(string[] args)
{
    CreateWebHostBuilder(args).Build().Run();
}

public static IWebHostBuilder CreateWebHostBuilder(string[] args) =>
    WebHost.CreateDefaultBuilder(args)
        .UseKestrel()
        .UseStartup<Startup>();
10. Describe the Servers in ASP.NET
Core.
Server is required to run any application. ASP.NET
Core provides an in-process HTTP server implementation to run the app.
This server implementation listen for HTTP requests and surface them to the
application as a set of request features composed into an HttpContext.
- Set up a process manager that starts the app when requests arrive and restarts the app after it crashes or the server reboots.
- For configuration of a reverse proxy, set up a reverse proxy to forward requests to the app.
IIS
Internet Information Services (IIS) is a flexible, secure and manageable Web Server for hosting web apps, including ASP.NET Core. Supported Platforms Windows.
Kestrel
Kestrel is a cross-platform web server for ASP.NET Core. Kestrel is the web server that's included and enabled by default in ASP.NET Core project templates.
HTTP.sys
HTTP.sys is a web server for ASP.NET Core that only runs on Windows. HTTP.sys is an alternative to Kestrel server and offers some features that Kestrel doesn't provide.
Windows Service
An ASP.NET Core app can be hosted on Windows as a Windows Service without using IIS. When hosted as a Windows Service, the app automatically starts after server reboots.
12. How to read values from
Appsettings.json file?
To read values from an Appsettings.json file in a .NET Core application, you can use the IConfiguration interface provided by the Microsoft.Extensions.Configuration package. Here are the steps you can follow:
- Add the Microsoft.Extensions.Configuration NuGet package to your project.
- In your Startup.cs file, add the following using statements:
using Microsoft.Extensions.Configuration;
using Microsoft.Extensions.Configuration.Json;- In the Configure method of your Startup.cs file, create a new instance of the IConfiguration interface and load the Appsettings.json file using the ConfigurationBuilder class:
public void Configure(IApplicationBuilder app, IHostingEnvironment env)
{
    // ...

    var config = new ConfigurationBuilder()
        .SetBasePath(env.ContentRootPath)
        .AddJsonFile("Appsettings.json", optional: true, reloadOnChange: true)
        .Build();

    // ...
}- Once you have the IConfiguration instance, you can read the values from the Appsettings.json file using the GetSection method and specifying the section and key:
var setting1Value = config.GetSection("AppSettings")["Setting1"];
var setting2Value = config.GetSection("AppSettings")["Setting2"];
That's it! You can now use the values from the Appsettings.json file in your .NET Core application. Note that the above steps assume that your Appsettings.json file is located at the root of your project. If it is located in a different directory, you will need to adjust the path in the AddJsonFile method accordingly.
You can also read the appsettings.json values using options pattern
described Read values from
appsettings.json file.
13. What is the Options Pattern in
ASP.NET Core?
Options Pattern allow you to access related configuration
settings in Strongly typed way using some classes. When you are accessing the
configuration settings with the isolated classes, The app should adhere these
two principles.
Interface Segregation Principle (ISP) or Encapsulation: The
class the depend on the configurations, should depend only on the configuration
settings that they use.
Separation of Concerns: Settings for different classes
should not be related or dependent on one another.
The Options pattern is a feature of ASP.NET Core that provides a simple and consistent way to configure application settings and access them across the application.
Here are the steps to use the Options pattern in ASP.NET Core:
- Define a class to represent your settings. This class should have properties to hold the values of the settings. For example, if you have an Appsettings.json file with the following content:
{
  "MySettings": {
    "Setting1": "Value1",
    "Setting2": "Value2"
  }
}
You can create a class like this:
public class MySettings
{
    public string Setting1 { get; set; }
    public string Setting2 { get; set; }
}- Register your settings with the dependency injection container in the ConfigureServices method of your Startup.cs file:
services.Configure<MySettings>(Configuration.GetSection("MySettings"));In your controller or other class, you can inject the IOptions interface for your settings class:
private readonly MySettings _settings;

public MyController(IOptions<MySettings> settings)
{
    _settings = settings.Value;
}
You can now access the settings values through the properties of the MySettings object:
var setting1Value = _settings.Setting1;
var setting2Value = _settings.Setting2;
That's it! The Options pattern makes it easy to access configuration settings across your application.
14. How to use multiple environments in ASP.NET Core?
ASP.NET Core allows you to configure your application for multiple environments, such as development, staging, and production. This is useful because you can use different settings and configurations for each environment.
Here are the steps to use multiple environments in ASP.NET Core:
- Define environment-specific configuration files. For example, you can create Appsettings.Development.json, Appsettings.Staging.json, and Appsettings.Production.json files in your project's root directory.
- In your Startup.cs file, add the following code to set up environment-specific configuration:
public Startup(IWebHostEnvironment env)
{
    var builder = new ConfigurationBuilder()
        .SetBasePath(env.ContentRootPath)
        .AddJsonFile("Appsettings.json", optional: false, reloadOnChange: true)
        .AddJsonFile($"Appsettings.{env.EnvironmentName}.json", optional: true)
        .AddEnvironmentVariables();
    Configuration = builder.Build();
}
This code loads the Appsettings.json file and the environment-specific file for the current environment, and adds environment variables to the configuration.
- Use the IWebHostEnvironment interface to access the current environment in your code. For example, you can inject it into your controller or service:
public class MyController : Controller
{
    private readonly IWebHostEnvironment _env;

    public MyController(IWebHostEnvironment env)
    {
        _env = env;
    }

    // ...
}- In your launchSettings.json file, you can define the environment to use when you run the application:
"profiles": {
    "MyApp": {
        "commandName": "Project",
        "environmentVariables": {
            "ASPNETCORE_ENVIRONMENT": "Development"
        }
    }
}
This sets the ASPNETCORE_ENVIRONMENT environment variable to "Development" when you run the application using the "MyApp" profile.
That's it! You can now use different settings and configurations for each environment in your ASP.NET Core application.
ASP.NET Core use environment variables to configure
application behavior based on runtime environment. launchSettings.json file sets ASPNETCORE_ENVIRONMENT to Development on local
Machine. For more visit How to use multiple
environments in ASP.NET Core
15. How Routing works in ASP.NET Core?
Routing is a fundamental concept in ASP.NET Core that maps incoming requests to specific actions in your application. When a request comes in, ASP.NET Core uses a routing system to determine which action method to invoke.
UseRouting is a middleware component that is responsible for setting up routing in your application. It analyzes incoming HTTP requests and identifies which controller and action method to execute. It also sets up endpoints that can be used to access specific routes and handles routing in the application pipeline. UseRouting must be called before UseEndpoints.
UseEndpoints is a middleware component that is responsible for mapping requests to their corresponding actions in the application. It sets up endpoint routing and is used to define how the incoming requests should be handled. This component takes an Action<IEndpointRouteBuilder> as an argument which is responsible for defining the mapping rules.
For more you can refer ASP.NET Core Routing
16. How to handle errors in ASP.NET
Core?
ASP.NET Core provides several ways to handle errors that occur during the execution of your application. Here are some common ways to handle errors in ASP.NET Core:
- Use Exception Filters: Exception Filters allow you to intercept exceptions that occur during the execution of your application. You can use them to log the exception, display a friendly error message to the user, or redirect the user to a different page.
- Use Middleware: Middleware allows you to intercept requests and responses in your application's pipeline. You can use middleware to catch exceptions and log them, display a friendly error message to the user, or redirect the user to a different page.
- Use the built-in Error Handling Middleware: ASP.NET Core includes a built-in Error Handling Middleware that catches unhandled exceptions and displays a developer-friendly error page. You can customize this page to include your own branding and error messages.
- Use try-catch blocks: You can use try-catch blocks in your code to catch exceptions that occur in a specific section of your application. You can then log the exception, display a friendly error message to the user, or redirect the user to a different page.
- Use a logging framework: Logging frameworks like Serilog or NLog can help you log exceptions that occur in your application. You can then use these logs to diagnose and fix errors in your code.
Overall, it's important to handle errors in your ASP.NET Core application to ensure a smooth user experience and to help diagnose and fix errors in your code.
For more visit Error handling
17. How ASP.NET Core serve static files?
ASP.NET Core provides a built-in middleware called Static Files Middleware that can serve static files such as HTML, CSS, JavaScript, images, and other web assets.
To serve static files in an ASP.NET Core application, you need to follow these steps:
- Include the Microsoft.AspNetCore.StaticFiles NuGet package in your project. You can do this using the Package Manager Console in Visual Studio or by editing your project file directly.
- In your Startup.cs file, add the following code in the Configure method: app.UseStaticFiles(); This code adds the Static Files Middleware to the middleware pipeline, which enables it to serve static files.
- By default, the middleware looks for static files in the wwwroot folder of your project. So, make sure to add your static files to this folder.
- Finally, you can access your static files by navigating to the appropriate URL. For example, if you have a file named index.html in the wwwroot folder, you can access it by navigating to http://localhost:5000/index.html in your web browser.
18. ExplainSession and State management
in ASP.NET Core?
Session and state management are important concepts in web development that allow you to maintain information about a user's interaction with a web application across multiple requests.
In ASP.NET Core, there are several ways to manage session and state:
- Session Middleware: The Session Middleware is a built-in middleware that provides support for managing user sessions. Sessions are stored on the server and can be used to store user-specific data, such as user preferences or shopping cart contents. To use the Session Middleware, you need to configure it in your Startup.cs file by calling the AddSession and UseSession methods on the IServiceCollection and IApplicationBuilder interfaces, respectively.
- TempData: TempData is a dictionary object that is used to store data between two requests. TempData values are stored in the user's session and are deleted when they are read. TempData can be used to pass data between two actions in a controller.
- ViewState: ViewState is a feature of ASP.NET Web Forms that allows you to store values in a hidden field on the page. ViewState is used to maintain the state of a page across postbacks.
- QueryString: The QueryString is a collection of name/value pairs that are appended to the end of a URL. QueryString values can be used to pass data between pages.
- Cookies: Cookies are small text files that are stored on the user's computer. Cookies can be used to store user-specific data, such as login information or user preferences.
When choosing a method of state management, it's important to consider factors such as security, performance, and scalability. For example, storing sensitive data in cookies is not recommended as cookies can be easily accessed and manipulated by attackers. Session state can be a good choice for storing sensitive data as it is stored on the server and can be encrypted.
19. Explain the Caching or Response caching in ASP.NET Core?
Caching is a technique used in web development to improve performance by storing frequently accessed data in memory. This reduces the number of times that the data needs to be retrieved from the database or generated dynamically, which can result in faster response times and improved scalability.
In ASP.NET Core, you can use the Response Caching Middleware to cache responses from your application. This middleware can cache responses based on various criteria, such as the request URL, query string, and HTTP headers.
To use the Response Caching Middleware, you need to do the following:
- Add the middleware to your application's middleware pipeline in the Configure method of your Startup.cs file:
app.UseResponseCaching();- Configure the middleware by setting cache-related headers in the response, such as the Cache-Control header: This example sets the Cache-Control header to allow the response to be cached publicly for up to 60 seconds.
app.Use(async (context, next) =>
{
    context.Response.GetTypedHeaders().CacheControl = new CacheControlHeaderValue()
    {
        Public = true,
        MaxAge = TimeSpan.FromSeconds(60)
    };

    await next();
});- Apply the [ResponseCache] attribute to any controllers or actions that you want to cache:
[ResponseCache(Duration = 60)]
public IActionResult Index()
{
    //...
}
This example caches the response from the Index action for 60 seconds.
By default, the Response Caching Middleware stores cached responses in memory. However, you can also configure it to use a distributed cache, such as Redis or SQL Server, by setting the UseDistributedCache method on the ResponseCachingServicesOptions object. This allows cached responses to be shared across multiple instances of your application.
It's important to use caching judiciously and to consider factors such as the size of the cached data, the frequency of updates, and the impact of stale data on the user experience.
20. What is In-memory cache?
In .NET Core, the IMemoryCache interface provides an in-memory cache implementation that allows you to cache data in memory within your application. This cache is typically used for data that is expensive to compute or retrieve, but which can be safely cached for a period of time.
The IMemoryCache interface provides methods for adding, retrieving, and removing items from the cache. The cache uses a key-value pair system to store and retrieve cached items. You can specify an expiration time for cached items, which causes the cache to automatically remove items after a specified period of time.
Here is an example of how to use the IMemoryCache interface in a .NET Core application:
using Microsoft.Extensions.Caching.Memory;

public class MyService
{
    private readonly IMemoryCache _cache;

    public MyService(IMemoryCache memoryCache)
    {
        _cache = memoryCache;
    }

    public string GetData(int id)
    {
        string cacheKey = $"Data_{id}";
        string cachedData;

        if (!_cache.TryGetValue(cacheKey, out cachedData))
        {
            // Data is not in cache, retrieve and cache it
            cachedData = RetrieveDataFromDatabase(id);
            _cache.Set(cacheKey, cachedData, TimeSpan.FromMinutes(10));
        }

        return cachedData;
    }

    private string RetrieveDataFromDatabase(int id)
    {
        // Code to retrieve data from database
    }
}
In this example, the MyService class uses an IMemoryCache instance to store and retrieve data. The GetData method first checks the cache for the requested data. If the data is not found in the cache, it retrieves the data from the database and caches it using the Set method of the cache object.
The TimeSpan.FromMinutes(10) parameter specifies the expiration time for the cached data. In this case, the data will remain in the cache for 10 minutes before it is automatically removed.
Note that the IMemoryCache implementation is an in-memory cache and is not designed for use as a distributed cache. If you need to share cache data across multiple instances of your application, you should consider using a distributed cache such as Redis or SQL Server.
21. What is Distributed caching?
Distributed caching is a technique used in web development to improve the performance and scalability of applications that run across multiple servers or instances. In .NET Core, you can use a distributed cache to store frequently accessed data in a shared cache that is accessible to all instances of your application.
.NET Core supports several distributed caching providers, including:
- SQL Server
- Redis
- Azure Cache for Redis
- Memcached
- Amazon ElastiCache
To use a distributed cache in .NET Core, you need to do the following:
- Install the appropriate caching provider package. For example, if you want to use Redis as your caching provider, you would install the Microsoft.Extensions.Caching.Redis package:
dotnet add package Microsoft.Extensions.Caching.Redis- Add the caching provider to your application's services in the ConfigureServices method of your Startup.cs file: This example adds Redis as the distributed caching provider and specifies the connection string for the Redis server.
services.AddDistributedRedisCache(options =>
{
    options.Configuration = "localhost:6379";
});- Use the distributed cache in your application by injecting the IDistributedCache interface into your services or controllers:
using Microsoft.Extensions.Caching.Distributed;

public class MyService
{
    private readonly IDistributedCache _cache;

    public MyService(IDistributedCache distributedCache)
    {
        _cache = distributedCache;
    }

    public string GetData(int id)
    {
        string cacheKey = $"Data_{id}";
        byte[] cachedData;

        cachedData = _cache.Get(cacheKey);

        if (cachedData == null)
        {
            // Data is not in cache, retrieve and cache it
            string data = RetrieveDataFromDatabase(id);
            cachedData = Encoding.UTF8.GetBytes(data);
            _cache.Set(cacheKey, cachedData, new DistributedCacheEntryOptions
            {
                AbsoluteExpirationRelativeToNow = TimeSpan.FromMinutes(10)
            });
        }

        return Encoding.UTF8.GetString(cachedData);
    }

    private string RetrieveDataFromDatabase(int id)
    {
        // Code to retrieve data from database
    }
}
In this example, the MyService class uses an IDistributedCache instance to store and retrieve data. The GetData method first checks the distributed cache for the requested data. If the data is not found in the cache, it retrieves the data from the database and caches it using the Set method of the cache object.
The new DistributedCacheEntryOptions object specifies the expiration time for the cached data. In this case, the data will remain in the cache for 10 minutes before it is automatically removed.
By using a distributed cache, you can improve the performance and scalability of your application by reducing the load on your database or other data sources. However, it's important to use caching judiciously and to consider factors such as the size of the cached data, the frequency of updates, and the impact of stale data on the user experience.
22. What is XSRF or CSRF? How to prevent
Cross-Site Request Forgery (XSRF/CSRF) attacks in ASP.NET Core?
Cross-Site Request Forgery (XSRF/CSRF) is an attack where
attacker that acts as a trusted source send some data to a website and perform
some action. An attacker is considered a trusted source because it uses the
authenticated cookie information stored in browser.
For example a user visits some site 'www.abc.com' then browser performs
authentication successfully and stores the user information in cookie and
perform some actions, In between user visits some other malicious site
'www.bad-user.com' and this site contains some code to make a request to
vulnerable site (www.abc.com). It's called cross site part of CSRF.
How to prevent CSRF?
Cross-Site Request Forgery (XSRF/CSRF) attacks can also affect ASP.NET Core Web APIs. However, the approach to prevent XSRF/CSRF attacks in a Web API is slightly different from that used in a web application. In a Web API, you can use the anti-forgery token to protect the endpoint that modifies state or performs any destructive operations.
Here's how to prevent XSRF/CSRF attacks in ASP.NET Core Web API:
- Add the Microsoft.AspNetCore.Mvc.Core package to your project:
dotnet add package Microsoft.Extensions.Caching.Redis- In your Web API, add the [ValidateAntiForgeryToken] attribute to the controller action method that performs the state-modifying or destructive operations: This attribute will ensure that the request is validated for an anti-forgery token before executing the action method. If the token is not valid or missing, the request will be rejected.
[HttpPost]
[ValidateAntiForgeryToken]
public IActionResult UpdateMyData(MyModel model)
{
    // Process the data
}- Add the services.AddAntiforgery() method to the ConfigureServices method in your Startup.cs file: This will configure the anti-forgery middleware to generate a unique token for each user session and include it in the response header with the name X-CSRF-TOKEN.
public void ConfigureServices(IServiceCollection services)
{
    // other services...

    services.AddAntiforgery(options =>
    {
        options.HeaderName = "X-CSRF-TOKEN";
    });
}- Include the X-CSRF-TOKEN header in your API requests that modify state or perform destructive operations. You can retrieve the token from the response header of your application's initial GET request and include it in subsequent requests.
By using these steps, you can help protect your ASP.NET Core Web API from XSRF/CSRF attacks and ensure that only authorized requests are allowed to modify state or perform destructive operations.
For more you can visit Prevent Cross-Site
Request Forgery (XSRF/CSRF)
23. Describe Attribute based routing.
Attribute Routing gives you more control over the URIs in your web application. MVC 5 supports this attribute based routing where attributes are used to define the routes. You can manage resource hierarchies in better way using attribute based routing. Attribute based routing is used to create routes which are difficult to create using convention-based routing. For example below routes.
[Route("customers/{customerId}/orders")]
public IEnumerable GetOrdersByCustomer(int customerId) { ... }
[Route("customers/{customerId}/orders/orderId")]
public IEnumerable GetOrdersByCustomer(int customerId, int orderId) { ... }
24. OAuth2.0 Authentication and Authorization .Net core?
OAuth2.0 is primarily an authorization framework, but it can also be used for authentication when combined with OpenID Connect (OIDC). In .NET Core, you can use the AddAuthentication method in the ConfigureServices method of your Startup class to configure OAuth2.0 authentication and authorization using OIDC.
public void ConfigureServices(IServiceCollection services)
{
// ...
services.AddAuthentication(options =>
{
options.DefaultScheme = CookieAuthenticationDefaults.AuthenticationScheme;
options.DefaultChallengeScheme = OpenIdConnectDefaults.AuthenticationScheme;
})
.AddCookie()
.AddOpenIdConnect(options =>
{
options.Authority = "https://example.com";
options.ClientId = "your_client_id";
options.ClientSecret = "your_client_secret";
options.ResponseType = "code";
options.Scope.Add("openid");
options.Scope.Add("profile");
options.CallbackPath = "/signin-oidc";
options.SignedOutCallbackPath = "/signout-callback-oidc";
options.TokenValidationParameters = new TokenValidationParameters
{
NameClaimType = "name"
};
});
// ...
}
In this example, we configure two authentication schemes: the "cookie" scheme and the "OpenID Connect" scheme. We set the "cookie" scheme as the default authentication scheme and the "OpenID Connect" scheme as the default challenge scheme.
We configure the "OpenID Connect" scheme by calling the AddOpenIdConnect method and providing the necessary options, such as the authority URL, client ID, and client secret. We also specify the response type as "code", which means that the authorization server will return an authorization code that the client application can exchange for an access token. We add the "openid" and "profile" scopes to the request, which are common scopes for OpenID Connect authentication.
We also configure the callback and sign-out callback paths, which the authorization server will use to redirect the user back to the client application after authentication or sign-out. We set the TokenValidationParameters to specify the name claim type as "name".
Once you have configured the authentication schemes, you can use them in your controllers or actions by applying the [Authorize] attribute to restrict access to authorized users. For example:
[Authorize]
public IActionResult MyProtectedAction()
{
// ...
}
This will redirect the user to the login page if they are not already authenticated, and then redirect them back to the protected action once they have successfully authenticated. The [Authorize] attribute also supports role-based authorization and policy-based authorization.
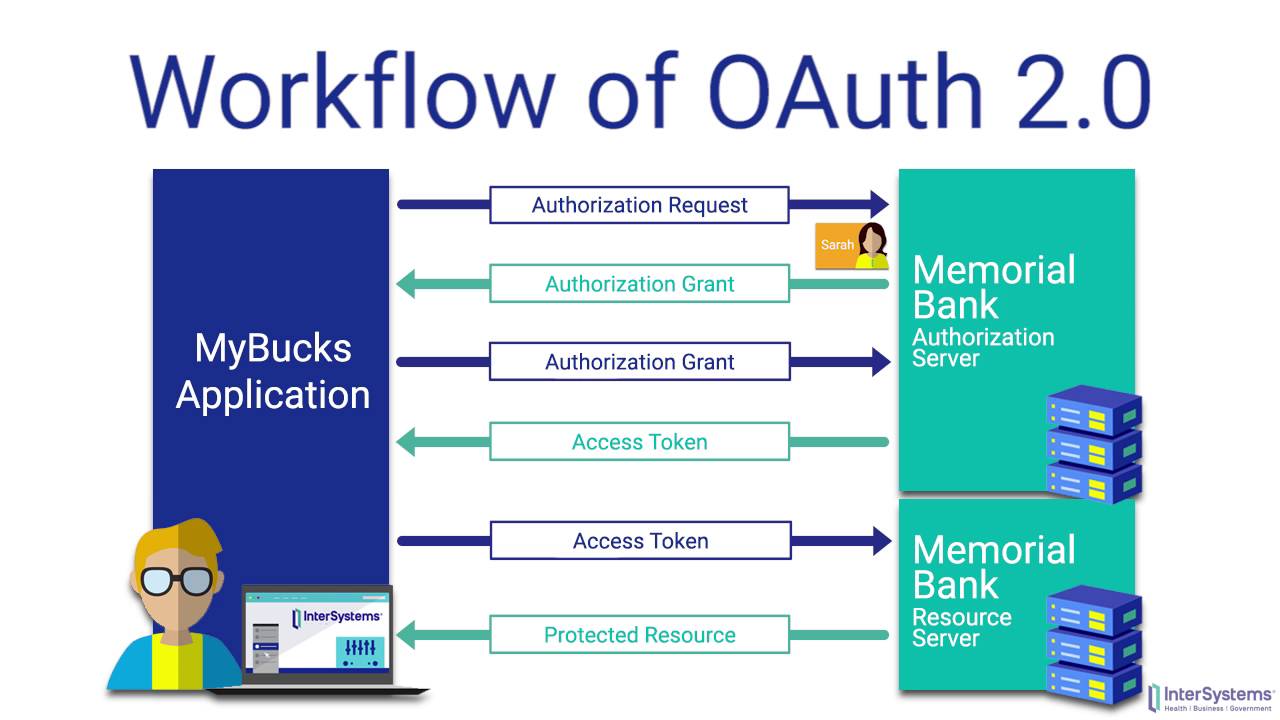
25. OAuth 2.0?
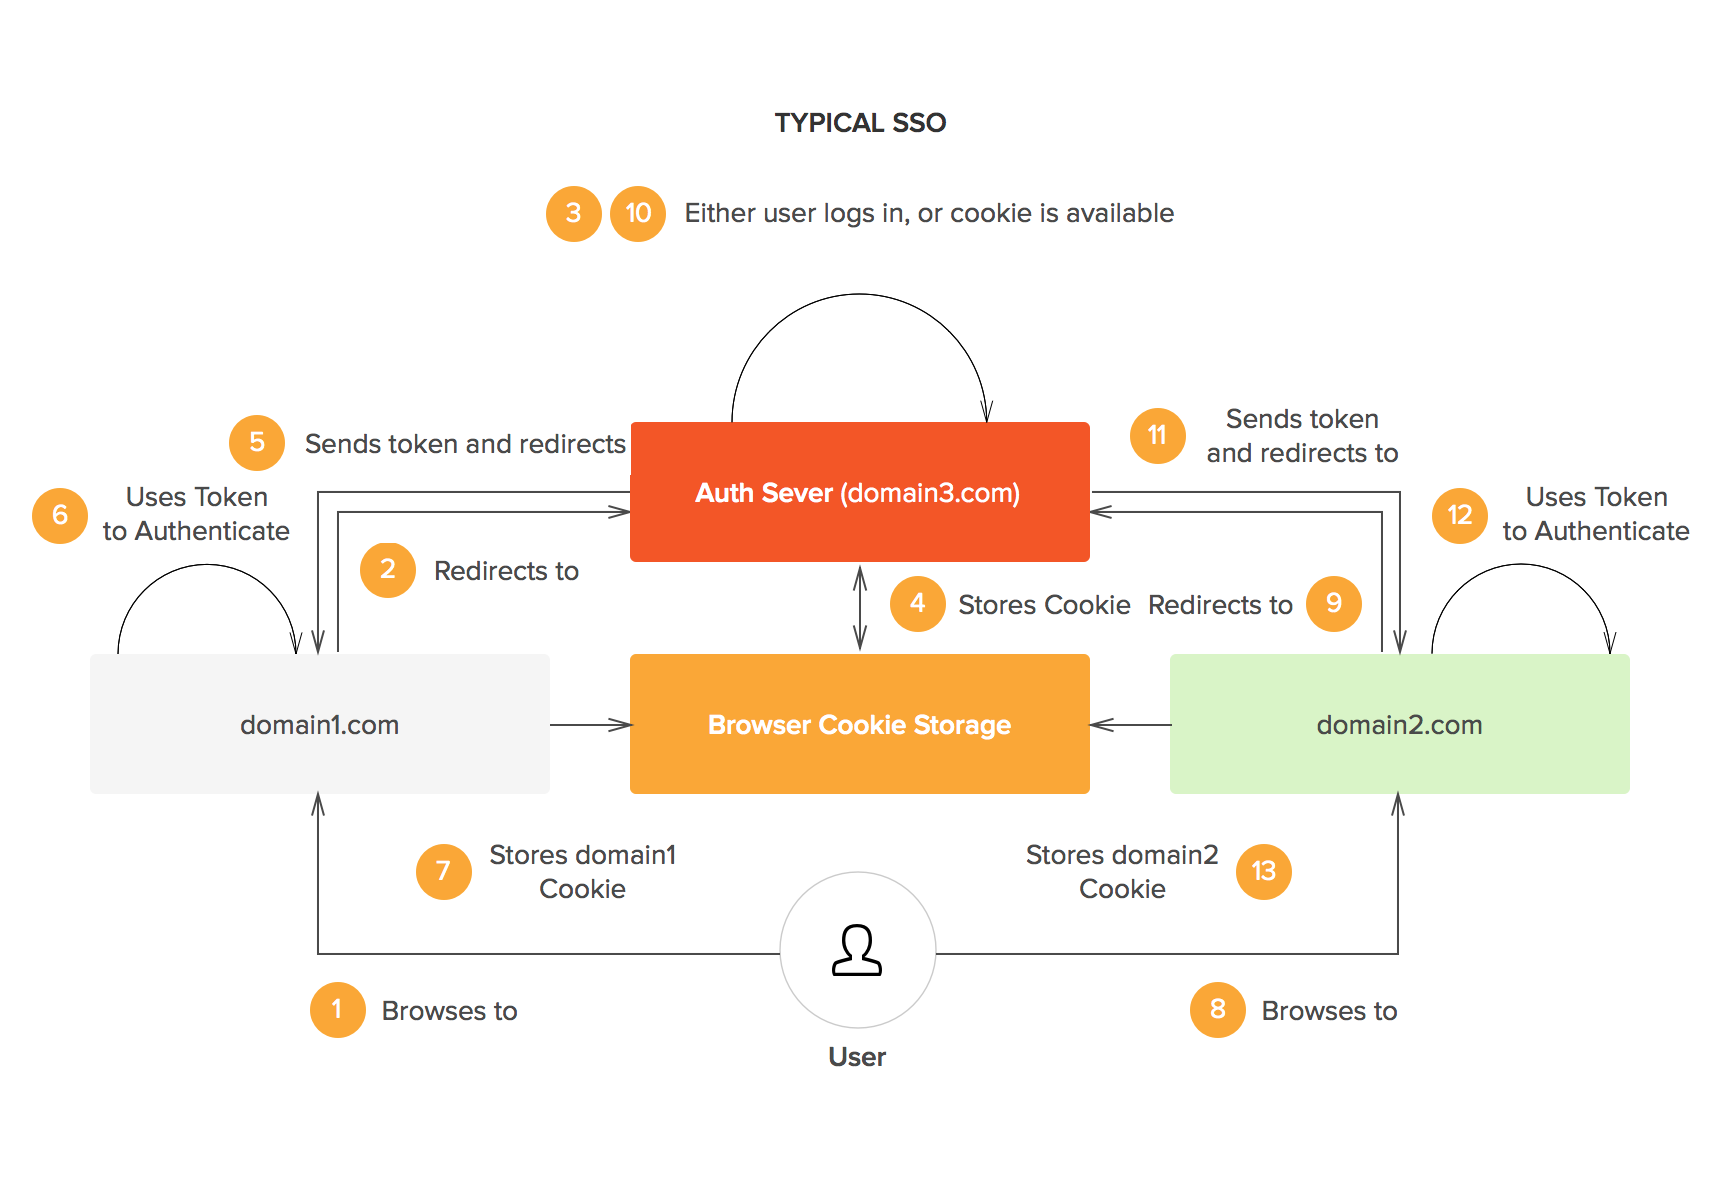
26. Single Sign On?
27. Comparison between Cookie and
Session?
|
Basis of
Comparison |
Cookie |
Session |
|
Definition |
Cookies are client-side files that are stored on a local
computer and contain user information. |
Sessions are server-side files that store user information. |
|
Expiry |
Cookies expire after the user specified lifetime. |
The session ends when the user closes the browser or logs
out of the program. |
|
Data storage |
It can only store a limited amount of data. |
It is able to store an unlimited amount of information. |
|
Capacity |
Cookies can only store up to a maximum of 4 KB of data in a
browser. |
There is a maximum memory restriction of 128 megabytes that
a script may consume at one time. However, we are free to maintain as much
data as we like within a session. |
|
Function |
It is not necessary for us to execute a function in order to
get cookies going because they are stored on the local computer. |
Utilizing the session start()method is required before we
can begin the session. |
|
Data Format |
Cookies are used to store information in a text file. |
The data is saved in an encrypted format during sessions. |
|
Storage |
Cookies are stored on a limited amount of data. |
A session can store an unlimited amount of data. |
28.
Here are the various .NET platforms that have been released over the years:
- .NET Framework: The .NET Framework is the original and most widely used .NET platform. It was released in 2002 and is still supported by Microsoft. It includes a large set of class libraries and supports a wide range of programming languages, including C#, VB.NET, and F#. It runs on Windows operating system and is used for developing Windows desktop applications, web applications, and server applications.
- .NET Core: .NET Core is a cross-platform, open-source version of the .NET Framework that was released in 2016. It is designed for developing modern cloud-based applications and supports Windows, Linux, and macOS. It has a smaller runtime footprint than the .NET Framework and is optimized for performance and scalability.
- Xamarin: Xamarin is a set of tools and libraries that allow developers to create native mobile apps for iOS, Android, and Windows using C# and the .NET Framework. It was acquired by Microsoft in 2016 and is now included as part of Visual Studio.
- .NET Standard: .NET Standard is a set of APIs that are guaranteed to be available on all .NET platforms, including .NET Framework, .NET Core, and Xamarin. It provides a common set of APIs that can be used by developers to create cross-platform libraries that can be used by any .NET platform.
- Unity: Unity is a game engine that allows developers to create 2D and 3D games for multiple platforms, including Windows, macOS, iOS, Android, and more. It uses C# as its scripting language and supports the .NET Framework.
- ASP.NET: ASP.NET is a web application framework that is built on top of the .NET Framework. It includes a set of libraries and tools that developers can use to create dynamic, data-driven web applications. ASP.NET Core is a cross-platform version of ASP.NET that is optimized for performance and scalability.
- .NET Compact Framework: The .NET Compact Framework was a version of the .NET Framework that was designed for use on mobile devices and embedded systems. It was released in 2003 and was based on the .NET Framework 1.0.
- .NET Micro Framework: The .NET Micro Framework is a smaller, lightweight version of the .NET Framework that is designed for use on resource-constrained devices, such as microcontrollers and other embedded systems. It was released in 2007.
- Silverlight: Silverlight was a browser plugin that allowed developers to create rich, interactive applications that could run in a web browser. It was released in 2007 and was based on the .NET Framework.
- Windows Runtime (WinRT): WinRT is a set of APIs that are used to develop modern Windows Store apps for Windows 8 and later versions. It is based on the .NET Framework and supports multiple programming languages, including C++, C#, and VB.NET.
- .NET Mono: .NET Mono is an open-source implementation of the .NET Framework that was developed by Xamarin, a company that was later acquired by Microsoft. It was released in 2004 and is designed to be a cross-platform implementation of the .NET Framework, allowing .NET applications to run on Linux, macOS, and other operating systems.
These are the main .NET platforms that are currently available, each with its own set of features and target platforms.
29. Compatibility between .net platforms ?
.NET platforms are designed to be compatible with each other, meaning that code written for one platform can often be run on another platform without modification, provided that the necessary components and libraries are available.
For example, .NET Standard is a set of APIs that are guaranteed to be available on all .NET platforms, including .NET Framework, .NET Core, and Xamarin. This allows developers to create libraries that can be used by any .NET application, regardless of the platform it is running on.
Similarly, .NET Core is designed to be compatible with the .NET Framework, with many of the same APIs and features available on both platforms. This allows developers to port applications between the two platforms with relative ease, as long as they are careful to account for any platform-specific differences.
However, there are some differences between the various .NET platforms that can make porting code more challenging. For example, the .NET Framework includes support for Windows Forms and other desktop-oriented technologies, while .NET Core is more focused on web and cloud-based applications. Additionally, there may be differences in the runtime environment, such as the way that garbage collection is handled, that can affect the performance and behavior of applications.
Overall, while there are some differences between the various .NET platforms, they are designed to be compatible with each other, and developers can often port code between platforms with relative ease, provided that they take into account any platform-specific differences and limitations.
30. .Net 7 feature?
.NET 7 is the latest release of the .NET platform, which includes a number of new features and improvements over previous versions. Here are some of the major new features included in .NET 7:
- Native-sized integers: In .NET 7, the runtime now includes support for native-sized integers, which can improve performance and reduce memory usage in certain scenarios.
- Source generators: Source generators are a new feature in .NET 7 that allow developers to generate code at compile-time based on existing code or metadata. This can be used to automate repetitive tasks, reduce boilerplate code, and improve performance.
- HTTP/3 support: .NET 7 includes support for the HTTP/3 protocol, which is the next generation of the HTTP protocol and is designed to improve performance and security over the internet.
- Cross-platform Arm64 support: .NET 7 now includes full support for Arm64 architectures on all major platforms, including Windows, Linux, and macOS.
- Improved event tracing: .NET 7 includes a number of improvements to the event tracing capabilities of the runtime, including new provider and consumer APIs, improved performance, and support for tracing asynchronous code.
- Improved performance: .NET 7 includes a number of performance improvements over previous versions, including improvements to garbage collection, JIT compilation, and memory allocation.
These are just a few of the major new features included in .NET 7. Overall, the release is focused on improving performance, adding new features to the runtime, and improving the developer experience across all major platforms.
31. What's the difference between RyuJIT and Roslyn?
RyuJIT and Roslyn are two different components of the .NET platform, with different roles and functionalities.
RyuJIT is the Just-In-Time (JIT) compiler used by the .NET runtime to compile IL (Intermediate Language) code into native machine code at runtime. RyuJIT is responsible for optimizing the compiled code to run as efficiently as possible on the specific hardware it is running on, and can make use of advanced optimization techniques like inlining, loop unrolling, and constant folding.
Roslyn, on the other hand, is a set of open-source compilers and code analysis APIs for C# and Visual Basic .NET languages. Roslyn is used primarily by developers and tools to analyze, refactor, and transform code, and includes features like syntax trees, symbol tables, and code analysis frameworks.
While RyuJIT and Roslyn are both important components of the .NET platform, they have different roles and functionalities. RyuJIT is responsible for optimizing compiled code at runtime, while Roslyn is used primarily by developers and tools to analyze and transform code during the development process.
32. What is CoreRT?
CoreRT is a .NET runtime optimized for running .NET applications on resource-constrained devices, such as Internet of Things (IoT) devices or mobile devices with limited memory and processing power. It is an open-source project, and is designed to be fast, lightweight, and efficient.
CoreRT achieves its performance improvements by using Ahead-of-Time (AOT) compilation to generate native machine code from .NET applications, rather than relying on Just-In-Time (JIT) compilation at runtime. This allows CoreRT to eliminate the overhead of JIT compilation, and to generate more efficient machine code that is tailored to the specific hardware it is running on.
In addition to AOT compilation, CoreRT also includes a number of other optimizations that are specifically designed for resource-constrained devices. For example, it includes a low-overhead garbage collector that is optimized for small memory footprints, and includes support for value types and struct layout optimizations that can reduce memory usage.
Overall, CoreRT is a powerful tool for developers who are building .NET applications for resource-constrained devices, and can help to improve performance and reduce memory usage in these environments.
33. What is Ahead-of-Time?
Ahead-of-Time (AOT) compilation is a method of compiling code ahead of time, rather than compiling it at runtime. In the context of the .NET platform, AOT compilation involves compiling IL (Intermediate Language) code into native machine code before the application is run, rather than relying on Just-In-Time (JIT) compilation to generate machine code at runtime.
AOT compilation can offer a number of advantages over JIT compilation. For example, AOT-compiled code can start up faster than JIT-compiled code, since there is no need to wait for the JIT compiler to generate machine code at runtime. AOT compilation can also offer better performance and lower memory usage, since the generated machine code is optimized for the specific hardware it is running on, and can eliminate some of the overhead associated with JIT compilation.
However, AOT compilation also has some limitations. Since the code is compiled ahead of time, it may not be able to take advantage of runtime optimizations that are specific to the input data or environment. Additionally, AOT-compiled code can be larger than JIT-compiled code, since it includes pre-generated machine code for all possible code paths, rather than generating code on-the-fly as needed.
Overall, AOT compilation is a powerful tool that can offer significant performance and startup time improvements in certain scenarios, particularly for resource-constrained environments where memory usage and startup time are critical factors.
34. What is Universal Windows Platform?
The Universal Windows Platform (UWP) is a development platform created by Microsoft that allows developers to create applications that run across a wide range of devices, including desktops, laptops, tablets, smartphones, Xbox consoles, and other devices running Windows 10. UWP applications can be distributed through the Microsoft Store, and can take advantage of a range of features and APIs that are specific to the Windows 10 platform.
One of the key benefits of UWP is its ability to adapt to different screen sizes and form factors. UWP applications can automatically adjust their user interface based on the screen size and resolution of the device they are running on, making it easy to create applications that work well across a wide range of devices. UWP also includes support for touch, pen, and other input modalities, making it easy to create applications that take advantage of the unique capabilities of different devices.
UWP also includes a range of features and APIs that are specific to the Windows 10 platform, such as support for Cortana, Windows Hello, and other Windows 10 technologies. UWP applications can also take advantage of the Windows Runtime (WinRT) APIs, which provide a standardized interface for interacting with a wide range of system resources, including sensors, cameras, and other hardware.
Overall, UWP is a powerful development platform that allows developers to create applications that can run across a wide range of devices and take advantage of the unique capabilities of the Windows 10 platform.
35. What is MEF in .NET Core?
MEF (Managed Extensibility Framework) is a framework for creating extensible applications in .NET. It allows developers to define extensibility points in their applications, and to dynamically load and unload components that implement those extension points at runtime.
In .NET Core, MEF is available as a NuGet package called System.Composition. This package provides a lightweight implementation of MEF that is designed to work well with .NET Core's modular architecture.
To use MEF in a .NET Core application, developers can add a reference to the System.Composition package and then define their extensibility points using the [Export] attribute. They can also define dependencies between components using the [Import] attribute. When the application is run, MEF will automatically load and wire up the components based on their exports and imports.
One of the key benefits of using MEF in .NET Core is that it allows developers to create modular, extensible applications that can be easily customized and extended by third-party developers. This can be particularly useful in scenarios where there is a need to add new functionality to an application without requiring a full recompilation and redeployment.
Overall, MEF is a powerful tool for creating extensible applications in .NET Core, and can help to improve the flexibility and maintainability of .NET Core applications.
36. What is IGCToCLR?
IGCToCLR (Interop Global COM Callable Wrapper to Common Language Runtime) is a tool provided by Microsoft for converting Interop COM objects to managed .NET objects. This tool is primarily used in scenarios where developers need to use legacy COM components in .NET applications.
When a COM component is added to a .NET application, the .NET runtime generates an interop assembly that defines a set of managed wrappers for the COM objects. These managed wrappers are known as COM Callable Wrappers (CCWs), and they allow the .NET runtime to interact with the COM objects as if they were native .NET objects.
IGCToCLR is used to generate these CCWs at runtime, by intercepting calls to the COM component and generating the corresponding managed objects on-the-fly. This process allows developers to use legacy COM components in .NET applications without requiring any modifications to the original component.
Overall, IGCToCLR is a powerful tool that can help to simplify the process of integrating legacy COM components into .NET applications, and can help to reduce the amount of time and effort required to migrate existing applications to the .NET platform.
37. What is CoreFX?
CoreFX is the foundational library for .NET Core, which is an open-source, cross-platform version of the .NET Framework developed by Microsoft. CoreFX provides a set of foundational libraries that are used by other .NET Core components and applications, including the .NET runtime, ASP.NET Core, and Entity Framework Core.
CoreFX includes a wide range of libraries that cover a variety of areas, including collections, networking, cryptography, and more. Some of the key libraries included in CoreFX include:
- System.Collections: Provides a set of collection types, such as lists, queues, and dictionaries.
- System.Net: Provides classes for working with network protocols and resources, including HTTP, FTP, and SMTP.
- System.Security.Cryptography: Provides classes for working with cryptographic algorithms and protocols, such as AES, RSA, and SSL/TLS.
- System.IO: Provides classes for working with files and directories, including reading and writing data to files and manipulating the file system.
Overall, CoreFX is a critical component of the .NET Core platform, and provides a rich set of foundational libraries that can be used to build a wide range of cross-platform applications and services.
38. What is CoreCLR?
CoreCLR is the .NET Core implementation of the Common Language Runtime (CLR), which is the virtual machine that manages the execution of .NET code. CoreCLR is an open-source, cross-platform runtime that supports the execution of .NET applications on Windows, Linux, and macOS.
CoreCLR is designed to be lightweight and optimized for modern application development scenarios, such as cloud-native applications and microservices. It includes a number of performance optimizations, such as just-in-time (JIT) compilation, background garbage collection, and high-performance interop with native code.
One of the key benefits of CoreCLR is its support for side-by-side versioning, which allows multiple versions of the runtime to be installed on the same machine without conflicts. This makes it easier to develop and deploy applications that target specific versions of the .NET Core platform.
CoreCLR also includes support for a number of advanced features, such as cross-platform debugging, runtime code generation, and dynamic code loading. These features can be particularly useful in scenarios where there is a need for dynamic, runtime-based code generation and execution, such as in scientific computing, data analytics, and other high-performance computing scenarios.
Overall, CoreCLR is a critical component of the .NET Core platform, and provides a powerful, lightweight, and highly optimized runtime for executing .NET applications across a variety of platforms and scenarios.
39. What is .NET Core CLI?
The .NET Core Command Line Interface (CLI) is a cross-platform tool used for creating, building, testing, and publishing .NET Core applications. It provides a set of commands that can be used from the command line to perform a wide range of tasks related to .NET Core development.
The .NET Core CLI includes a number of useful commands for managing projects, such as:
- new: Used to create new .NET Core projects, such as console applications, class libraries, and web applications.
- build: Used to build .NET Core projects, generating executable files or libraries.
- run: Used to run .NET Core applications from the command line.
- test: Used to run unit tests for .NET Core projects.
- publish: Used to package .NET Core applications for deployment, generating executable files or deploying to a hosting service.
In addition to these core commands, the .NET Core CLI also includes a number of other commands for managing packages, referencing external dependencies, and managing the .NET Core runtime environment.
The .NET Core CLI is designed to be cross-platform and can be used on Windows, Linux, and macOS. It is a powerful tool that can help to simplify the process of building, testing, and deploying .NET Core applications, and can be a valuable asset for developers working with the .NET Core platform.
No comments:
Post a Comment